The 4th of July is the perfect time to celebrate American independence with friends, family, and, of course, some red, white, and blue! What better way to show your patriotic spirit than with a unique, handcrafted 4th of July tie dye shirt? Making your own tie dye shirt is not only a fun and engaging activity, but it also allows you to create a personalized piece of wearable art. This guide will walk you through the process of creating stunning 4th Of July Tie Dye Shirts Diy, from gathering your supplies to mastering different tie dye techniques.
Whether you’re a seasoned tie dye enthusiast or a complete beginner, there’s a tie dye style for everyone. Let’s dive in and get ready to celebrate Independence Day in style!
Gathering Your Supplies: The Essential Tie Dye Kit
Before you start, you’ll need to gather your supplies. Having everything on hand will ensure a smooth and enjoyable tie dye experience. Here’s a list of essentials:
- White Cotton T-Shirts: 100% cotton shirts work best for tie dyeing as they absorb the dye more effectively. Consider buying pre-washed shirts to minimize shrinkage after dyeing. Look for good deals on 4th of july t shirts for women as a base.
- Tie Dye Kit: A tie dye kit typically includes dyes, applicator bottles, rubber bands, and gloves. Choose a kit with the colors you want to use, preferably red, white (which is actually the absence of dye on the white shirt), and blue for a patriotic theme.
- Rubber Bands: These are essential for creating different tie dye patterns. You’ll need a variety of sizes depending on the technique you choose.
- Gloves: Protect your hands from the dye.
- Applicator Bottles: These make it easier to apply the dye precisely. Most tie dye kits include these.
- Soda Ash (Optional): Soaking your shirt in a soda ash solution before dyeing helps the dye bond to the fabric, resulting in brighter and longer-lasting colors.
- Plastic Drop Cloth or Table Cover: Protect your work surface from dye spills.
- Plastic Bags or Containers: For wrapping the dyed shirts to allow the dye to set.
- Water: For mixing the dye and rinsing the shirts.
 tie-dye-supplies-kit
“Having the right supplies is half the battle,” says Sarah Miller, a textile artist from Portland, Oregon. “A well-stocked tie dye kit will make the process much smoother and more enjoyable.”
Exploring Tie Dye Techniques for Your 4th of July Shirt
Now that you have your supplies, it’s time to choose a tie dye technique. Here are a few popular options that are perfect for creating 4th of July tie dye shirts DIY:
- Spiral: A classic tie dye pattern that creates a swirling effect. Pinch the center of the shirt, twist it into a spiral, and secure it with rubber bands.
- Bullseye: Create concentric circles by pinching and tying sections of the shirt.
- Stripes: Fold the shirt accordion-style and secure it with rubber bands to create stripes.
- Scrunch: Scrunch the shirt randomly and secure it with rubber bands for a more abstract design.
- Starburst: Similar to the bullseye, but you pinch multiple points to create a starburst effect. This could be awesome ideas for 4th of july t-shirts.
Each technique offers a unique look, so experiment and find the one you like best! Here’s a closer look at the Spiral technique:
- Lay the damp shirt flat on your work surface.
- Pinch the fabric in the center of where you want the spiral to be.
- Twist the fabric around the center point until the entire shirt is in a spiral.
- Secure the spiral with rubber bands, dividing it into pie-shaped sections.
- Apply dye to each section, using your patriotic color palette.
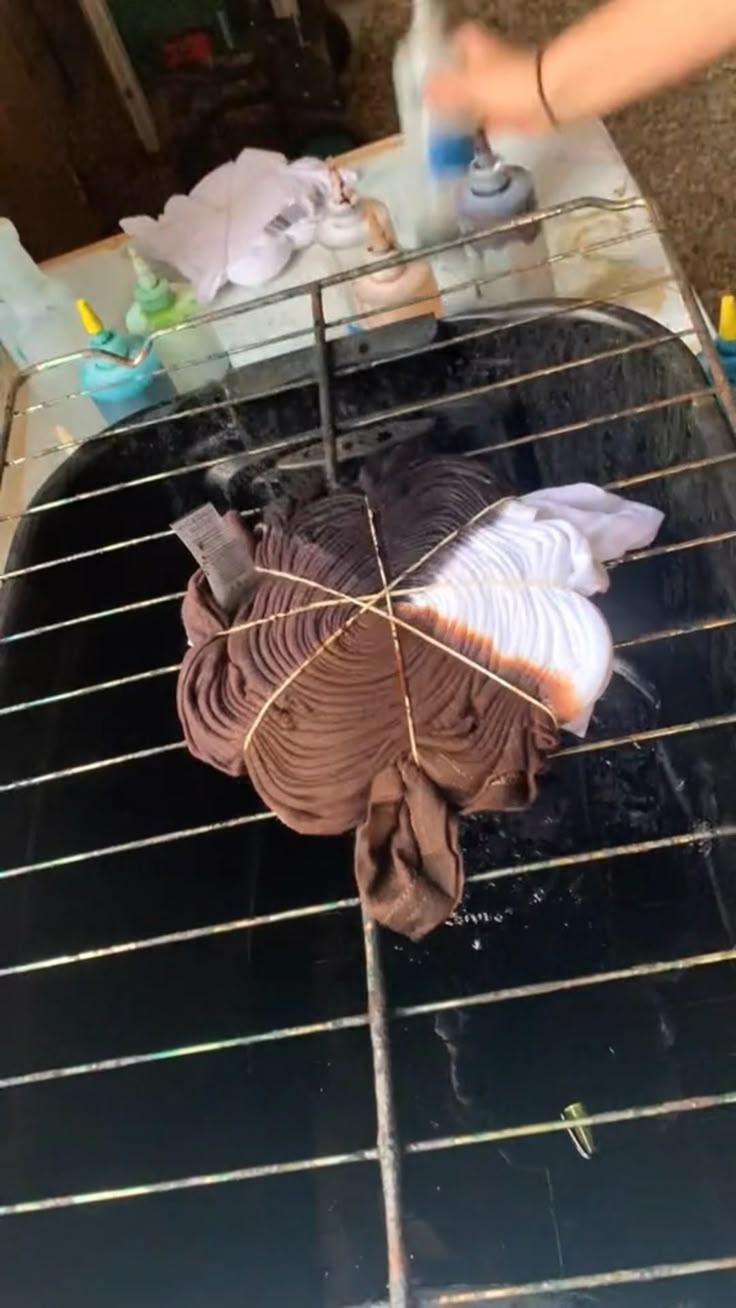
Dyeing Your Shirt: A Step-by-Step Guide
Once you’ve chosen your technique and prepped your shirt, it’s time to apply the dye. Here’s a general guide to the dyeing process:
- Protect Your Work Surface: Cover your work surface with a plastic drop cloth or table cover.
- Prepare the Dye: Follow the instructions on your tie dye kit to mix the dyes.
- Apply the Dye: Carefully apply the dye to the shirt, making sure to saturate the fabric. Use different colors for each section to create a vibrant design.
- Wrap the Shirt: Place the dyed shirt in a plastic bag or container. This will help the dye set properly.
- Let the Dye Set: Allow the dye to set for the recommended time, usually 6-8 hours, or even overnight for more vibrant colors.
- Rinse and Wash: Rinse the shirt thoroughly with cold water until the water runs clear. Then, wash the shirt separately in cold water with a mild detergent.
- Dry: Tumble dry on low heat or hang to dry.
Consider a 4th of july sleeveless shirts version if you want to wear it to the beach!
 tie-dye-spiral-shirt-process
Remember to wear gloves throughout the dyeing process to protect your hands from staining.
Adding a Patriotic Touch
To make your 4th of July tie dye shirts DIY even more festive, consider adding some patriotic embellishments. Here are a few ideas:
- Stars: Use a star-shaped stencil and fabric paint to add stars to your shirt.
- Glitter: Sprinkle glitter on the wet dye for a sparkly effect.
- Fabric Markers: Use fabric markers to draw patriotic designs or write messages on your shirt.
- Patches: Sew on patriotic patches, such as American flags or eagles.
- Bleach Pen: Carefully use a bleach pen to create designs on a darker tie dye background.
These extra touches will make your shirt truly unique and show off your American pride.
Tips for Success: Achieving the Best Tie Dye Results
To ensure your tie dye project is a success, keep these tips in mind:
- Pre-Wash Your Shirt: This removes any sizing or finishes that could prevent the dye from absorbing properly.
- Use Warm Water: Warm water helps the dye dissolve and penetrate the fabric better.
- Don’t Overcrowd the Dye: Give the dye room to spread and create its patterns.
- Rinse Thoroughly: Make sure to rinse the shirt thoroughly until the water runs clear to remove excess dye.
- Wash Separately: Wash the shirt separately for the first few washes to prevent the dye from bleeding onto other clothes.
“Experimentation is key to finding your own tie dye style,” suggests David Chen, a fashion blogger based in Los Angeles. “Don’t be afraid to try new techniques and color combinations.”
And why not think about a hello kitty 4th of july shirt for the kids?
Caring for Your Tie Dye Shirt: Keeping It Vibrant
To keep your 4th of July tie dye shirts DIY looking vibrant and new, follow these care instructions:
- Wash in Cold Water: Cold water helps prevent the dye from fading.
- Use a Mild Detergent: Harsh detergents can strip the dye from the fabric.
- Wash Inside Out: This helps protect the dyed surface from abrasion.
- Avoid Bleach: Bleach will fade the colors and can damage the fabric.
- Tumble Dry on Low Heat or Hang to Dry: High heat can cause the colors to fade and the fabric to shrink.
By following these care tips, you can enjoy your tie dye shirt for many Independence Day celebrations to come.
Conclusion: Celebrate in Style
Creating your own 4th of July tie dye shirts DIY is a fun and rewarding way to express your patriotism and creativity. With a little planning, some basic supplies, and a dash of imagination, you can create a unique and stylish shirt that’s perfect for celebrating Independence Day. So gather your friends and family, get your tie dye on, and show your American pride in style! Consider browsing 4th of july tie dye shirt ideas for extra inspiration!
FAQ: Frequently Asked Questions about 4th of July Tie Dye Shirts
- What type of dye is best for tie dyeing? Reactive dyes are generally considered the best for tie dyeing cotton shirts, as they bond permanently to the fabric.
- Can I use food coloring to tie dye? While you can use food coloring, it’s not recommended for long-lasting results. Food coloring tends to fade and wash out easily.
- How do I prevent the dye from bleeding? Pre-washing the shirt, using cold water for washing, and washing the shirt separately can help prevent dye from bleeding.
- How long should I let the dye set? The recommended time is usually 6-8 hours, but leaving it overnight can result in more vibrant colors.
- Can I tie dye a shirt that’s not 100% cotton? While cotton works best, you can tie dye shirts with a high cotton content (at least 80%).
- What if my tie dye colors are not as vibrant as I expected? Soaking the shirt in a soda ash solution before dyeing can help improve color vibrancy. Also, ensure you’re using a high-quality tie dye kit.
- Is tie dye safe for kids? Yes, tie dye is generally safe for kids, but adult supervision is recommended, especially when handling dyes and chemicals.
Pingback: DIY 4th of July Tie Dye Shirts: Celebrate Independence in Style - Creative T-Shirt, Hoodie, and Sweatshirt Ideas for Every Occasion | ShirtIdeas.us