Celebrating 100 days of school is a milestone in elementary education, and what better way to commemorate the occasion than with a custom-made 100 days of school shirt? This article will guide you through the process of creating a unique and memorable shirt, packed with ideas and tips to make your child’s celebration extra special.
Creating a 100 days of school shirt is not only a fun craft project, but also a fantastic way to engage children in learning and creativity. These shirts often become cherished keepsakes, reminding kids of their academic journey and the joy of reaching this significant milestone. Whether you’re a seasoned crafter or a beginner, this guide will provide the inspiration and practical advice you need to design a shirt that stands out.
Planning Your 100 Days of School Shirt
Before diving into the crafting process, it’s essential to plan your design. This includes brainstorming ideas, gathering materials, and considering your child’s preferences.
- Brainstorming Ideas: Start by thinking about themes or concepts that resonate with your child. Do they love animals, sports, or a particular subject like math or science? Incorporate these interests into the design. Consider puns, riddles, or visual representations of the number 100.
- Gathering Materials: You’ll need a plain t-shirt (preferably cotton for easy decorating), fabric markers, paint, stencils, iron-on transfers, beads, buttons, glue, and any other embellishments you desire.
- Considering Your Child’s Preferences: Involve your child in the planning process. Ask them about their favorite colors, characters, and activities. This will ensure they love the final product and feel a sense of ownership.
Creative Design Ideas for a 100 Days of School Shirt
Now that you have a plan, let’s explore some creative design ideas that will make your 100 days of school shirt truly unique.
Counting-Based Designs
One of the most common themes for 100 days of school shirts involves counting to 100. Here are a few ideas:
- 100 Objects: Glue 100 small objects to the shirt, such as buttons, beads, pom-poms, or googly eyes. This is a great way to engage children in counting and fine motor skills.
- Tally Marks: Draw 100 tally marks on the shirt using a fabric marker. You can group them into sets of five for easier counting.
- Number Chart: Create a grid on the shirt and write the numbers 1 through 100 in order. This provides a visual representation of the counting process.
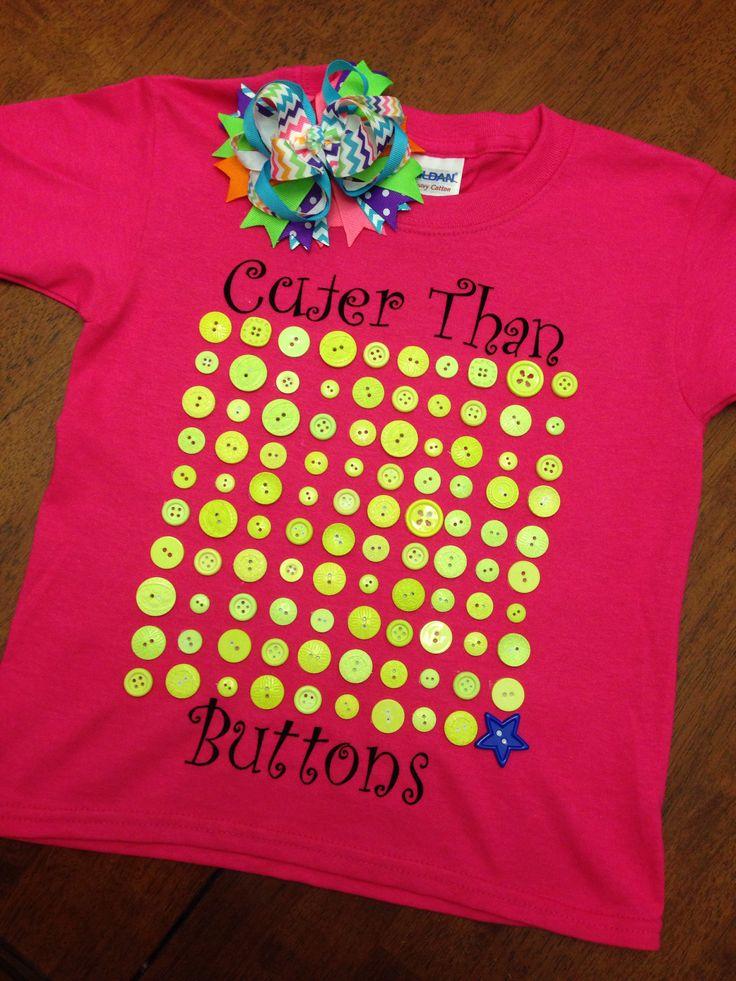 100 days shirt decorated with colorful buttons
Themed Designs
Themed shirts allow you to incorporate your child’s interests and passions into the design.
- Math Theme: Use math symbols and equations to create a visually appealing design. For example, you could write “100 = 50 + 50” or “10 x 10 = 100.”
- Science Theme: Incorporate science-related images such as beakers, atoms, or planets. You could write “100 Days Smarter” alongside these images.
- Book Theme: Feature characters from your child’s favorite books or write quotes related to reading and learning. A fun idea is to draw 100 books on the shirt.
Pun-Based Designs
Puns and witty sayings can add a touch of humor to your 100 days of school shirt.
- “100 Days Smarter”
- “100 Days Brighter”
- “I Survived 100 Days of School!”
- “100 Days and Still Learning!”
“Remember, the most important thing is to have fun and let your child’s personality shine through,” says Eleanor Vance, a child education specialist with over 15 years of experience. “The process of creating the shirt is just as valuable as the final product.”
Step-by-Step Guide to Making a 100 Days of School Shirt
Here’s a simple step-by-step guide to help you create your masterpiece:
- Prepare the Shirt: Wash and dry the t-shirt to remove any sizing or wrinkles. Iron the shirt to create a smooth surface for decorating.
- Sketch Your Design: Lightly sketch your design on the shirt using a pencil. This will help you visualize the layout and ensure everything fits properly.
- Apply Fabric Markers or Paint: Use fabric markers or paint to fill in your design. If using paint, apply thin layers and allow each layer to dry completely before adding another.
- Add Embellishments: Glue on buttons, beads, or other embellishments to add texture and dimension to your shirt. Make sure to use a strong adhesive that is suitable for fabric.
- Iron-On Transfers: If you’re using iron-on transfers, follow the instructions provided by the manufacturer. Make sure to protect the design with a cloth before ironing.
- Let it Dry: Allow the shirt to dry completely before wearing it. This may take several hours, depending on the materials used.
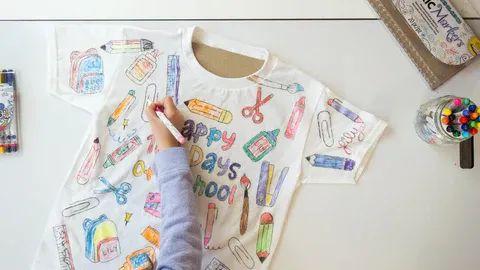 Girl drawing 100 days of school shirt with fabric markers
Tips for Success
- Use High-Quality Materials: Invest in high-quality fabric markers, paint, and embellishments to ensure your design lasts.
- Protect Your Work Surface: Cover your work surface with newspaper or a drop cloth to prevent spills and stains.
- Test Your Materials: Before applying any materials to the shirt, test them on a scrap piece of fabric to ensure they don’t bleed or fade.
- Involve Your Child: Let your child participate in the creation process as much as possible. This will make the shirt even more meaningful to them.
- Set the Design: After the design is complete, set it by ironing the shirt inside out. This will help the design last longer.
“Don’t be afraid to get creative and experiment with different techniques,” advises David Chen, a professional artist and educator. “The most important thing is to have fun and express your unique style.”
Maintaining Your 100 Days of School Shirt
To keep your 100 days of school shirt looking its best, follow these care instructions:
- Wash the shirt inside out in cold water.
- Use a gentle detergent.
- Avoid using bleach.
- Tumble dry on low or hang to dry.
- Iron inside out on a low setting.
Making it Educational
Creating a 100 days of school shirt can also be an educational opportunity. Here are a few ways to incorporate learning into the process:
- Counting Practice: Have your child count out 100 objects to glue onto the shirt.
- Math Problems: Incorporate math problems into the design.
- Vocabulary Building: Use the shirt to teach new vocabulary words related to the theme of the shirt.
Celebrating 100 days of school with a custom shirt is a memorable and creative way to mark this milestone. By following these tips and ideas, you can create a unique and personalized shirt that your child will cherish for years to come. Remember to have fun and let your creativity shine!
Frequently Asked Questions (FAQ)
Q: What type of shirt is best for making a 100 days of school shirt?
A: A plain, light-colored cotton t-shirt is generally the best choice. Cotton is easy to decorate and provides a smooth surface for fabric markers and paint.
Q: What are the best fabric markers to use?
A: Look for fabric markers that are specifically designed for use on clothing. Brands like Tulip, Sharpie (fabric markers), and Crayola offer a variety of colors and tip sizes.
Q: How can I make sure the design doesn’t fade in the wash?
A: To prevent fading, wash the shirt inside out in cold water using a gentle detergent. Avoid using bleach and tumble dry on low or hang to dry. Ironing the shirt inside out can also help set the design.
Q: Can I use iron-on transfers for my 100 days of school shirt?
A: Yes, iron-on transfers are a great option for adding images or text to your shirt. Follow the instructions provided by the manufacturer carefully.
Q: How can I involve my child in the design process?
A: Involve your child by asking them about their favorite colors, characters, and activities. Let them help choose the design and materials, and allow them to participate in the decorating process.
Q: What if I’m not very creative?
A: Don’t worry! There are plenty of templates and stencils available online that can help you create a professional-looking design. You can also keep it simple with a few basic shapes and colors.
Q: How much does it cost to make a 100 days of school shirt?
A: The cost of making a 100 days of school shirt can vary depending on the materials you use. However, it’s generally a very affordable project, especially if you already have some of the supplies on hand.
In conclusion, crafting a 100 days of school shirt is a wonderful way to celebrate your child’s academic achievement. With a bit of planning, creativity, and these helpful tips, you can create a unique and memorable shirt that your child will treasure. So gather your materials, unleash your imagination, and get ready to celebrate 100 days of learning in style!